
 Skip to content
Customize the Dock in macOS Ventura

There are a number of settings you can change to control how the macOS Dock looks and behaves, which can help improve your use of the macOS UI element. Here’s how to access them.
History
The Dock has been around since macOS was originally an operating system at Steve Jobs’ second company, NeXT. The original Mac had no dock, and its inclusion in macOS when Apple bought NeXT in 1997 was a highly contentious issue at Apple.
When it was included in macOS, several additional options were added so that users could customize the Dock to their liking – including hiding it completely.

Original NeXStep desktop – with Dock shown at right.
Customize the Dock in macOS
Visit today to customize the Dock in macOS System Settings->Desktop & Dock from the Apple menu in the macOS menu bar. Most Dock-related items are at the top of this settings window:
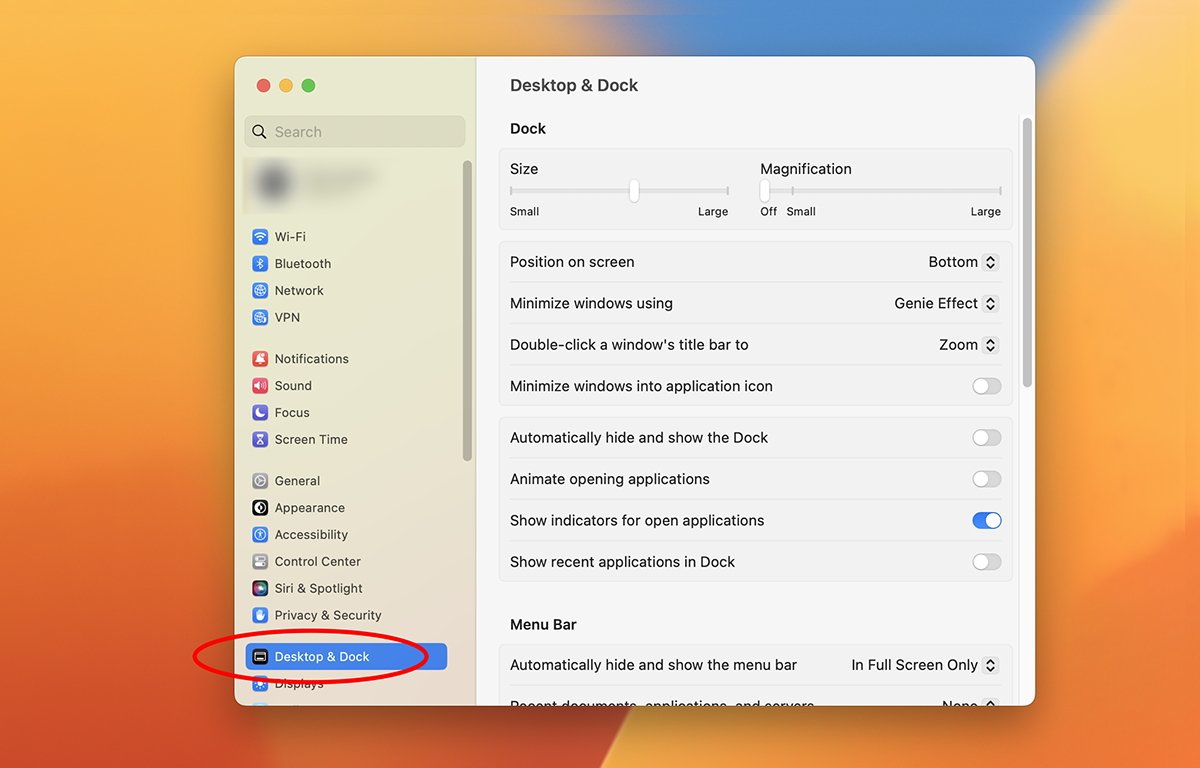
Select “Desktop & Dock” on the left.
At the top of the Desktop & Dock window are two sliders. One controls the Dock size, while the other controls the Dock magnification level when you mouse over it.
If you cram a lot of apps into the Dock, the Finder will shrink the icons down to their smallest size to fit everything.
You can also turn off the magnification completely so that the icons do not move when you mouse over them.
Next is a pop-up menu that changes the position of the Dock on the screen. You have three choices: Left, Bottomor Rightwith Bottom standard in macOS out of the box.
The next point, Minimize windows using, determines which animation is used to minimize Finder windows in the Dock when you click the yellow minimize buttons in windows. You have two choices: Spirit or Dish.
Double-click a window’s title bar to: determines what happens to a window when you double-click its title bar. You can disable this option, zoom in on the window or minimize it.
If you enable the following item, Minimize the window in the application icon, Finder shrinks the window to its parent app and adds it to a pop-up menu when you click a window’s yellow minimize button. You can access the minimized window by Control-clicking or right-clicking the app’s icon in the Dock.
Hide and show the Dock automatically hides the Dock by default, but shows it if you hover over the edge of the screen where you’ve set the Dock to appear. Users who feel the Dock gets in the way and blocks the screen can use this option to hide and show the Dock at will with a simple mouse pointer.
Animate opening applications, causes an app’s icon to bounce up and down in the Dock when the app launches. Turn this off for better response by not using the start animation.
Show open application indicators causes the Dock to display a small dot under any currently running app. This can be useful for seeing at a glance which apps are running by simply looking at the Dock.
Show recent applications in Dock causes the Dock to display apps that have been used recently, but are now closed, on the right side of the Dock next to the Recycle Bin.
Most of the other settings in this System Settings pane apply to the desktop, not the Dock, so we’ll skip those.
Add and remove items
To add an app to the Dock, drag it from the Finder to the Dock. It will be inserted where you put it.
You can also drag and drop multiple items at once to add them all to the Dock.
To delete an item, click and hold it, then drag it away from the Dock until the little “Delete” badge appears, then release the mouse button.
To add files or folders to the Dock, drag them to the Dock to the right of the separator item on the right. All documents and folders are stored to the right of the divider, but to the left of the trash.
No matter what you do, the Recycle Bin always stays on the right side of the Dock.
Customize folders
Once folders are added to the Dock, you can Control-click or right-click them to open a pop-up menu for customization. That menu lets you change how folder items are sorted, display a folder as a stack, change how content is displayed when you click the item, and other options.

Control-click a folder to open the pop-up menu.
If you use the View content as menu option List, the Finder displays a popover the next time you click the folder, showing a simple vertical list of folder contents. This can be useful for browsing subfolder hierarchies in an instant.
If you use the View content as menu option Fan, when you click the folder in the Dock, the contents of the folder appear accordion-style, complete with each item’s thumbnail and name. If you set it to Schedulewhen you click on the folder, Finder displays a popover with a grid of folder contents:
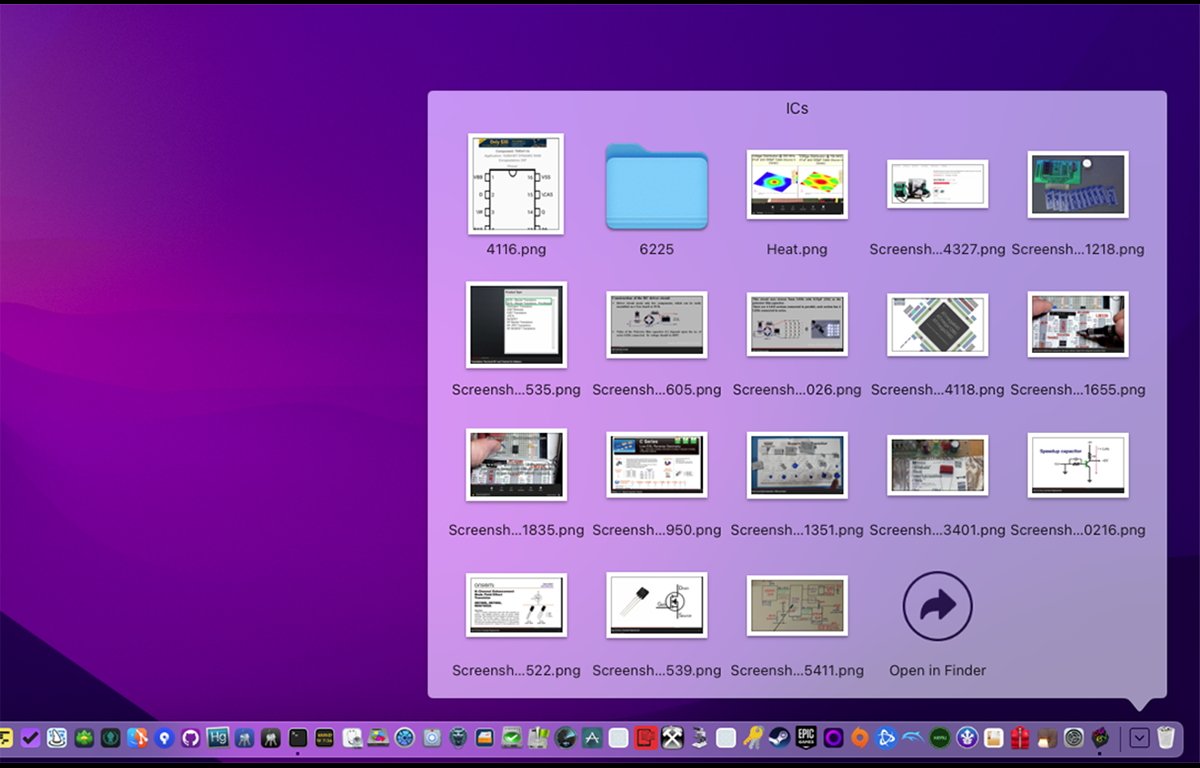
Grid view on Control-click.
Control-clicking or right-clicking an app in the Dock brings up a small pop-up menu. One menu item in Dock pop-up menus is Options. Selecting it brings up a submenu with three more items:
- Remove from Dock
- Open at Login
- Show in Finder
The first item speaks for itself.
If you select Open at LoginFinder adds a login item for this app to the list of items to open when you first log in.
The next time you log in, all items added to Login Items will run automatically. To prevent an item from running on login, select the same menu item again.
If you select Show in FinderFinder opens the app’s parent folder on the desktop.
The preferences file
All settings for the Dock in macOS are stored in an XML file called com.apple.dock.plist which lives on your startup disk in /Users/~/Library/Preferences/.
You can customize the Dock by editing this file, but keep in mind that if you damage the file’s structure or change a critical setting to a value that macOS doesn’t understand, you can prevent the Dock from appearing.
You may want to back up the file just in case before making any changes to it.
Inside the Dock .plist file is an array called “persistent apps”. This array contains all the apps that appear to the left of the divider in the Dock.
If you have a lot of apps in the Dock and want to uninstall a lot of them at once, in bulk, hold down the Control key and click items in this array, delete the items, save the file, and launch you restart it.
The next time the Finder loads the Dock, the list of apps displayed will be updated.
To return your Dock to its original state, delete this file and restart your Mac. You can even save multiple copies of the Dock .plist file to a folder, then replace the existing one with a saved copy and reboot to change the appearance of the Dock for different work scenarios.
Restart dock
You may have noticed that if you force quit the Finder, the new Dock state doesn’t always reload when the Finder is running. This is because the Dock is actually its own separate process that runs independently of the Finder.
If you run the macOS Activity Monitor in the /Utilities folder and look for “Dock”, you will see the Dock process running. You can shut it down and restart it by selecting it from the list of processes and then clicking the small X (Stop) button in the Activity Monitor toolbar.
If Finder detects that the Dock has closed, it will automatically restart in a few seconds.
You can also force restart the Dock in macOS’s Terminal by typing:
killall Dock and press Yield.
Possibilities
Apple hasn’t really updated the Dock in a long time, except cosmetically. A few additions can make it even more useful than it already is.
For example, being able to group apps like they do in iOS, being able to select apps in the Dock multiple times for bulk deletion or reordering, a “Move to” menu item to send an app to another folder on disk, and even a “Check for update” in the App Store option.
It would also be nice to display a subset of the Finder’s Get Info data in a popover, especially the version number of the app.
There are many ways to customize the Dock in macOS, and with these options you can make it behave exactly the way you want it to.
Stay connected with us on social media platform for instant update click here to join our Facebook


